How to solve the Rubik’s Cube
There are many approaches on how to solve the Rubik’s Cube. All these methods have different levels of difficulties, for speed cubers or beginners, even for solving the cube blindfolded. Usually people can solve one face of the cube intuitively, after that they need some help. In the following article I’m going to show you the easiest way to solve the cube using the beginner’s method.
Step 1: How to solve the white edge pieces in the first layer
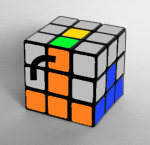
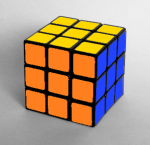
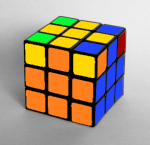
Bad white cross
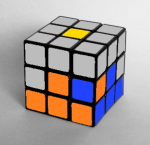
Good white cross
The easiest step is solving the first layer edges of the Rubik’s Cube. Choose one color you want to start with. In this beginner's tutorial we’re going to start with the white face.
I suggest you try to solve the first face without reading these instructions, so you can feel the sense of accomplishment when you complete it all alone. This step is not so hard because you don’t have to take care of so many solved cubelets.
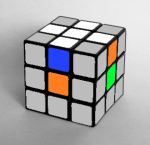
You can determine where a piece comes according to the colour of the center pieces which never swap places. Every edge must fit to the side center piece too. See the attached image.
The idea is to put the first edge to the right spot, oriented correctly, then the second piece so you don’t mess up the one you have already solved. When you solve the fourth you have to take care not to mess up the three solved pieces so it gets harder step by step.
Bad white cross
Good white cross
Some example moves
Check out the algorithms below to see what moves you have to know. Press the play button to see the animations.
The most complicated case is when three edges are done and the last one is oriented wrong:
Another tricky situation is when the last white edge is on the front face but you can’t just simply move it to the top because it’s oriented wrong. In this case use the following permutation to flip the piece.
Similar to the previous cases, sometimes you find the last edge in the second layer oriented wrong.
Step 2: How to solve the white corners in the first layer

Finishing the first layer of the rubik's cube is not a big deal. Just like in the previous step, the white corners can be easily completed by an average people intuitively after a short familiarization with the cube.
The second step of the beginner's rubik's cube tutorials doesn’t require long algorithms. You just have to apply some short permutations which you don’t even have to memorize.
Some example tricks
Some short example situations you might be facing while solving your rubik's cube when you want to move a white corner piece to the top layer.
According to the orientation there are three cases:
Some short example situations you might be facing while solving your rubik's cube when you want to move a white corner piece to the top layer.
According to the orientation there are three cases:
First case:
Second case:
Third case:
When the white corner piece is in the white layer just in a wrong spot or oriented bad you need to take it out to the bottom layer and do one of the previous moves.
When the white corner piece is in the white layer just in a wrong spot or oriented bad you need to take it out to the bottom layer and do one of the previous moves.
Using only one algorithm: R’ D’ R D
There’s an algorithm which works all the time in every cases. The bad thing is that it’s longer than the optimal moves.
If you have already read this tutorial then if might be familiar from the last step when we're completing the yellow layer corners.
Let’s say we want to bring a white corner piece to the front-right-up position. The idea is to move the corresponding corner piece below this spot, move the corner piece in question to the front-right-down spot and do the R’ D’ R D algorithm until the cubelet will fit in the white layer.
Depending of the initial orientation you’ll have to perform this permutation…
…once when the white is facing right…
…three times when it’s facing down…
…and five times when white is facing forward.
Step 3: How to solve the second layer of the Rubik’s Cube (F2L)
 Until this point we could work intuitively without any algorithm to memorize, but in this stage when we’re solving the second layer (first two layers – F2L) of the Rubik’s Cube solving the second layer(first 2 layers- F2L) of the Rubik's cube people usually get stuck because there are too many moves to foresee in order to complete this step. You’ll have to learn two algorithms which bring the edge piece from the yellow layer to the second layer without messing up the white face already solved. Until this point we held the cube with the white center facing up, now turn it upside down to let you review the puzzle better.
Until this point we could work intuitively without any algorithm to memorize, but in this stage when we’re solving the second layer (first two layers – F2L) of the Rubik’s Cube solving the second layer(first 2 layers- F2L) of the Rubik's cube people usually get stuck because there are too many moves to foresee in order to complete this step. You’ll have to learn two algorithms which bring the edge piece from the yellow layer to the second layer without messing up the white face already solved. Until this point we held the cube with the white center facing up, now turn it upside down to let you review the puzzle better.
The Right and Left algorithms:
 Right: U R U’ R’ U’ F’ U F
 Left: U’ L’ U L U F U’ F’
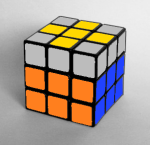
 Wrong orientation
We are going to call these the Right and Left algorithms. As you can see on the animations these bring the front-up edge to the right-front or left-front positions.
Wrong orientation
We are going to call these the Right and Left algorithms. As you can see on the animations these bring the front-up edge to the right-front or left-front positions.
Right: U R U’ R’ U’ F’ U F
Left: U’ L’ U L U F U’ F’
Wrong orientation
We are going to call these the Right and Left algorithms. As you can see on the animations these bring the front-up edge to the right-front or left-front positions.
The Right algorithm
The Left algorighm
Wrong orientation
When the edge piece is on the right spot but oriented wrong or it’s not in the upper layer you’ll have fix it in two steps, first it needs to be taken to the top of the cube. In the example below we use the Right algorithm twice.
Step 4: How to make a yellow cross on the top of the Rubik’s Cube?
So far we have solved two bottom layers and only the yellow face is left. In this fourth stage of our tutorial we want to form a yellow cross on the top of the cube. At this point it doesn’t matter if the edge pieces don’t match the color of the side center pieces. We will .switch them in the fifth step.
There’s a short algorithm we have to use: F R U R’ U’ F’.
Besides the solved position there are two other possible patterns: an “L” shape or a line as illustrated below. In case of the “L” shape you’ll have to do the algorithm twice, forming the line in the first stage. See the picture below to understand how this algorithm changes the top layer of the Rubik's cube. The orientation of the cube is important, so the “L” shape is twisted as illustrated and the line must be horizontal.
 See the animation below to see how you have to hold the puzzle in your hands when you execute the algorithm. Press the play button!
There’s another algorithm, very similar to the one presented above which is a shortcut and takes you from the “L” shape directly to the finished yellow cross: F U R U’ R’ F’.
This is the inverse of the first permutation. Play the animation to see how this is working.
See the animation below to see how you have to hold the puzzle in your hands when you execute the algorithm. Press the play button!
There’s another algorithm, very similar to the one presented above which is a shortcut and takes you from the “L” shape directly to the finished yellow cross: F U R U’ R’ F’.
This is the inverse of the first permutation. Play the animation to see how this is working.
Step 5: How to swap two yellow edges in the top layer?
In the previous step we created yellow cross on the top of the Rubik's cube but probably the yellow edges are not all fitting to the colors of the side center pieces. In this stage of the rubik's cube solution we have have to fix this by repositioning these cubelets.

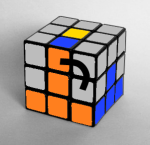
The algorithm we’re going to use switches the front-top and the left-top edges as marked on the image: R U R’ U R U U R’ U.
When you get to this stage the first thing you have to do is to rotate around the top layer trying to find two edges which have to be switched. Sometimes it can occur that you can’t find two pieces to swap next to each other, because you would have to swap two which are facing each other. In this case you’ll have to execute the permutation twice, as shown on the second animation.
Switch two edges in the last layer
Press the play button to see how to switch the orange-yellow and green-yellow edges.
Press the play button to see how to switch the orange-yellow and green-yellow edges.
Sometimes the algorithm has to be applied twice
Execute it twice to swap to pieces in the opposite sides of the cube.
Execute it twice to swap to pieces in the opposite sides of the cube.
Step 6: Position yellow corners
We have almost finished solving the rubik's cube, only the yellow corners are left. In this step we just have to put them in the right spot, it doesn’t matter if the orientation is wrong. We’re going to take care about the orientation in the next step.use the permutation below which cycles around three corners in the upper layer counterclockwise swapping the pieces marked on the image: U R U’ L’ U R’ U’ L
Press the Play button to see the algorithm action:
Press the Play button to see the algorithm action:
Try to find a yellow corner which is on the right position, then place this one in the front-right-top of the puzzle and execute the permutation. If the pieces didn’t get where they belong do the algorithm one more time.
Sometimes you can’t find a piece in the correct spot. In this case utilize the same algorithm to bring one piece to the correct position.
Due to the parity the amount of the correctly positioned yellow cubelets is limited to the three cases: there’s no yellow corner piece in the correct position, or there’s only one, or all the four pieces are correct.
Step 7: Orient last layer corners on your Rubik’s Cube
On this page you can find a detailed description on how to solve the last layer corners of the Rubik’s Cube. In the final phase of the solution with the beginner's method we will orient the yellow corner pieces.
 The cube is solved
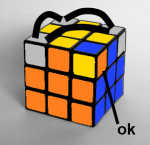
 Orient the corner pieces
In this final step all the pieces are on the right spot, you just have to orient the last layer corners corners which are now on the top of the puzzle.
Hold the cube in your hand so the upper piece you want to orient is on the front-right-top corner, then do the R’ D’ R D algorithm twice or four times until that specific piece is oriented correctly. It seems like you messed up the whole cube but don’t worry, it will be all right when all the corner pieces are oriented.
After that with one ore more U’ turns move another yellow corner piece you want to orient to the front-right-top corner of the cube and repeat R’ D’ R D again while this specific piece is ok.
Keep doing this until your Cube is solved.
Orient the corner pieces
In this final step all the pieces are on the right spot, you just have to orient the last layer corners corners which are now on the top of the puzzle.
Hold the cube in your hand so the upper piece you want to orient is on the front-right-top corner, then do the R’ D’ R D algorithm twice or four times until that specific piece is oriented correctly. It seems like you messed up the whole cube but don’t worry, it will be all right when all the corner pieces are oriented.
After that with one ore more U’ turns move another yellow corner piece you want to orient to the front-right-top corner of the cube and repeat R’ D’ R D again while this specific piece is ok.
Keep doing this until your Cube is solved.
On this page you can find a detailed description on how to solve the last layer corners of the Rubik’s Cube. In the final phase of the solution with the beginner's method we will orient the yellow corner pieces.
The cube is solved
Orient the corner pieces
In this final step all the pieces are on the right spot, you just have to orient the last layer corners corners which are now on the top of the puzzle.
Hold the cube in your hand so the upper piece you want to orient is on the front-right-top corner, then do the R’ D’ R D algorithm twice or four times until that specific piece is oriented correctly. It seems like you messed up the whole cube but don’t worry, it will be all right when all the corner pieces are oriented.
After that with one ore more U’ turns move another yellow corner piece you want to orient to the front-right-top corner of the cube and repeat R’ D’ R D again while this specific piece is ok.
Keep doing this until your Cube is solved.
Animated examples
To see the animations just click the play button and follow the steps. Adjust the speed if it’s too fast for you. We have separated the R’ D’ R D bits so you can see better how to apply this algorithm.
Example 1.
Two wrong pieces next to each other
(R’ D’ R D) (R’ D’ R D) U (R’ D’ R D) (R’ D’ R D) (R’ D’ R D) (R’ D’ R D) U
Example 2.
For three corners
(R’ D’ R D) (R’ D’ R D) U (R’ D’ R D) (R’ D’ R D) U2 (R’ D’ R D) (R’ D’ R D) U
Example 3.
Two corners on opposite sides
U (R’ D’ R D) (R’ D’ R D) U2 (R’ D’ R D) (R’ D’ R D) (R’ D’ R D) (R’ D’ R D) U
These algorithms may seem to be long but they’re repeating the same R’ D’ R D sequence all the time, so you just have to memorize this short algorithm and the method how to use it.
No comments:
Post a Comment