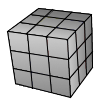
Rubik’s Cube solution with advanced Friedrich (CFOP) method
The first speedcubing world championship was held in 1982 in Budapest and it was won by Minh Thai(USA) with a 22.95 seconds solution time. Since then the methods have evolved and we are capable of reaching solution times below 6 seconds. If you want to improve your cubing speed, all you need is a high quality,well lubricated rubix cube with good corner cutting and optimal tensioning so the pieces don’t pop. Practice finger tricks, the art of turning the cube like you can barely see the movements. You’ll also need a rubik's cube timer to keep track of your evolution, and a lot of practice of the method described in the tutorial below.
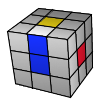
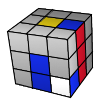
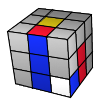
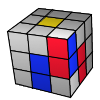
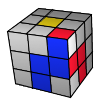
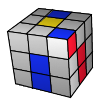
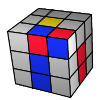
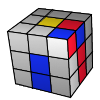
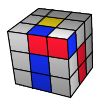
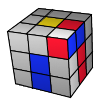
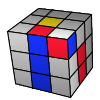
Cross

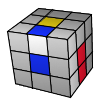
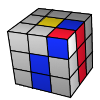
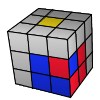
F2L
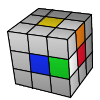
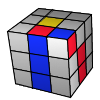
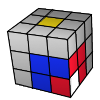
OLL
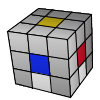
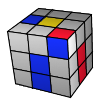
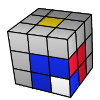
PLL
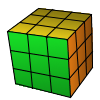
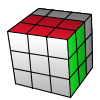
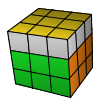
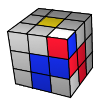
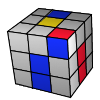
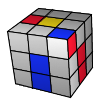
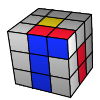
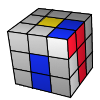
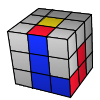
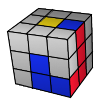
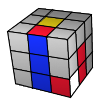
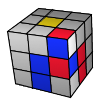
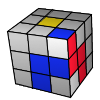
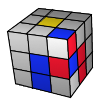
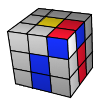
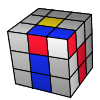
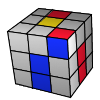
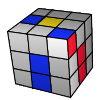
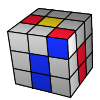
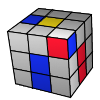
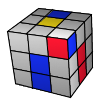
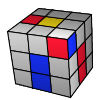
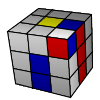
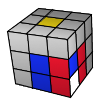
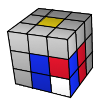
When talking about the advanced technique of solving the rubik's cube we have to mention the Petrus system and the Friedrich method (or full CFOP) which is used by the big majority of speed cubers these days. This advanced technique developed by Jessica Friedrich divides the puzzle into layers and you have to solve the cube layer by layer using algorithm in each step, not messing up the pieces already in place. These steps are the following: cross F2l OLL and PLL, as seen on the illustration above.
The method developed by Jessica Friedrich involves memorizing a lot of algorithms, but there is a logical connection between them. After a lot of practice you will develop the ability to execute these operations intuitively.
Steps of the advanced method
First step: form a white cross
I assume that at this point you are familiar with the notations of the rubik's cube and you can solve the cube with beginner's method. If not then I strongly recommend you visit these pages to avoid any confusion.
It’s up to you which face you want to start with, let’s make a convention that for the sake of this tutorial we’ll start with the white face. Our goal is to form a cross at the bottom of the rubik's cube in a way that the sides of the white edges match the lateral centre pieces. Experienced cubers foresee the steps when they inspect the cube and they plan this step. In most cases you’ll need 6 rotations to complete this phase, and you should never need more than 8.
White face always down
Hold your cube in your hands with the white centre facing down to improve your solution time. With a lot of practice you won’t need to see the white cross because you will know what’s going on down there according to the color scheme of your puzzle, your moves and what you see on the top. This way you don’t have to turn your cube around, saving this way a lot of time. Some speedcubers prefer solving the cross on the left side but if you choose to make it on the bottom you’ll have a nice lookahead and is more suitable foe finger tricks. The only bad thing is that it’s weird for beginners and you can’t notice in time if you messed the cross up.
It would be more intuitive to solve it on the top and turning upside down when it’s done, but you’ll need to learn it this way if you want to reach times below 20 seconds. To encourage you I have to tell that the knowledge of the next step (F2L) will help you a lot in the understanding of the manipulation of the cube upside down. You will discover the advantages of this perspective and you will admit that this is the best way of doing it. And if you really want to master the Rubik’s Cube I recommend you to examine the cube and try to plan all the necessary steps and execute them without watching.
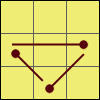
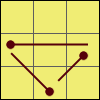
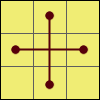
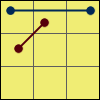
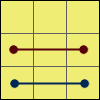
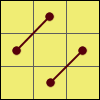
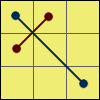
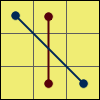
Some examples – Basic idea
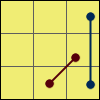
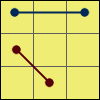
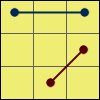
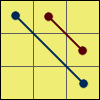
The examples below show a couple situations you can meet. The first one is very easy, you just have to turn the edge piece to the correct position. The second shows how to reorient a piece. The third example demonstrates how to place two pieces in one step. The last step shows the steps to fix the Superflip (the “most scrambled Rubik’s Cube”) in only 6 moves.
F2
U’ R’ F R
F R2 D2
Superflip: R F L B R D
This first step of solving the white cross is actually an intuitive stage of the solution process. We couldn’t even cover every possible situations because at this stage there are so many cases. Almost everyone could get this far without learning algorithms. But you’ll need to practice forming the white cross to make it efficient. Do it smoothly, without stopping and with the cross facing downwards. If this works well, you can proceed in our tutorial to the second step: F2L
Step 2: First two layers – F2L
The first two layers (F2L) of the Rubik’s Cube are solved simultaneously rather than individually, reducing the solve time considerably. In the second step of the Friedrich method we solve the four white corner pieces and the middle layer edges attached to them. The 41 possible cases in this step can be solved intuitively but it’s useful to have a table of algorithms printed on your desk for guidance.
To be efficient try not to turn your cube around while solving and look ahead as much as possible. Familiarize with the algorithms so you can do them even with your eyes closed.
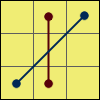
In the beginner’s method solving the white corners and the second layer edges were two separate steps, but in this stage you should already know this. In the advance Friedrich method we’re going to pair them in the top layer, then insert them where they belong. The simple example below demonstrates a lucky situation where the red-blue edge piece goes where it belongs while we solve the white corner. If the red-blue corner is somewhere else, then first we need to get it to the back-top position.
Be intuitive or learn algorithms?
An intuitive approach of this situation would suggest to solve this case in the following steps: to take the two pieces to the top layer, then joining them to insert where they belong to: (R U2 R’) (F’ U2 F) (U’ R U R’). However the following algorithm is much quicker because it’s the same series of movements repeating: (R U R’ U’) (R U R’ U’) (R U R’ U’)
Let’s see the possible situtations you might meet in this stage. Cases grouped by the position of the white corner and the edge that needs to be attached to it:
1st: Easy cases
These are the lucky cases which can be solved in 3-4 moves.
R U R’
F’ U’ F
U’ F’ U F
U R U’ R’
2nd case: Corner in bottom, edge in top layer
The first two should be familiar from the beginner's method:
(U R U’ R’) (U’ F’ U F)
(U’ F’ U F) (U R’ U’ R)
(F’ U F) (U’ F’ U F)

(R U R’) (U’ R U R’)
(R U’ R’) (U R U’ R’)
(F’ U’ F) (U F’ U’ F)
3rd case: Corner in top, edge in middle
(R U R’ U’) (R U R’ U’) (R U R’)
(R U’ R’) (d R’ U R)
(U F’ U F) (U F’ U2 F)
(U F’ U’ F) (d’ F U F’)
(U’ R U’ R’) (U’ R U2 R’)
(U’ R U R’) (d R’ U’ R)
4th case: Corner pointing outwards, edge in top layer
In this case we usually bring the cube to a basic case, reorienting the white corner in the first stage.
(R U’ R’ U) (d R’ U’ R)
(F’ U F U’) (d’ F U F’)
(U F’ U2 F) (U F’ U2 F)
(U’ R U2 R’) (U’ R U2 R’)
(U F’ U’ F) (U F’ U2 F)
(U’ R U R’) (U’ R U2 R’)
(U’ R U’ R’ U) (R U R’)
(U F’ U F U’) (F’ U’ F)
(U’ R U R’ U) (R U R’)

(U F’ U’ F U’) (F’ U’ F)
(U F’ U2 F U’) (R U R’)
(U’ R U2 R’ U) (F’ U’ F)
5th case: Corner pointing upwards, edge in top layer
(R U R’ U’) U’ (R U R’ U’) (R U R’)
y’ (R’ U’ R U) U (R’ U’ R U) (R’ U’ R)
(U2 R U R’) (U R U’ R’)

(U2 F’ U’ F) (U’ F’ U F)
(U R U2 R’) (U R U’ R’)
(U’ F’ U2 F) (U’ F’ U F)
(R U2 R’) (U’ R U R’)
(F’ U2 F) (U F’ U’ F)
6th case: Corner in bottom, edge in middle
(R U’ R’ d R’ U2 R) (U R’ U2 R)
(R U’ R’ U R U2 R’) (U R U’ R’)
(R U’ R’ U’ R U R’) (U’ R U2 R’)
(R U R’ U’ R U’ R’) (U d R’ U’ R)
(R U’ R’ d R’ U’ R) (U’ R’ U’ R)
Step 3 – Orient last layer – OLL
While solving the rubik's with the advance friedrich method, when the first 2 layers(F2L) are solved we need to orient the last layer (OLL) so the upper face of the rubik's cube is all yellow. We don’t care if the side colors don’t match, we are going to permute the last layer(PLL) later.
You’ll need to learn all the 57 algorithm below to complete this in one step. If this seems too many I recommend you learn the 2look OLL which uses only 9 algorithms but of course it’s slower.
Let’s group them according to their look.
Dot

R U B’ l U l2′ x’ U’ R’ F R F’

R’ F R F’ U2 R’ F R y’ R2 U2 R

y L’ R2 B R’ B L U2′ L’ B M’

R’ U2 x R’ U R U’ y R’ U’ R’ U R’ F

(R U R’ U) R’ F R F’ U2 R’ F R F’

M’ U2 M U2 M’ U M U2 M’ U2 M

R’ U2 F (R U R’ U’) y’ R2 U2 x’ R U

F (R U R’ U) y’ R’ U2 (R’ F R F’)
Line

R’ U’ y L’ U L’ y’ L F L’ F R

R U’ y R2 D R’ U2 R D’ R2 d R’

F U R U’ R’ U R U’ R’ F’

L’ B’ L U’ R’ U R U’ R’ U R L’ B L
Cross

L U’ R’ U L’ U (R U R’ U) R

(R U R’ U) R U’ R’ U R U2 R’

L’ U R U’ L U R’

R’ U2 (R U R’ U) R

R’ F’ L F R F’ L’ F

R2 D R’ U2 R D’ R’ U2 R’

R’ F’ L’ F R F’ L F
4 corners

M’ U’ M U2′ M’ U’ M

L’ (R U R’ U’) L R’ F R F’
Shape _|

L F R’ F R F2 L’

F R’ F’ R U R U’ R’

R’ U’ R y’ x’ R U’ R’ F R U R’

U’ R U2′ R’ U’ R U’ R2 y’ R’ U’ R U B

F (R U R’ U’) (R U R’ U’) F’

L F’ L’ F U2 L2 y’ L F L’ F
Shape |_

U’ R’ U2 (R U R’ U) R2
y (R U R’ U’) F’
y (R U R’ U’) F’

r U2 R’ U’ R U’ r’

R’ U2 l R U’ R’ U l’ U2 R

F’ L’ U’ L U L’ U’ L U F

R’ F R’ F’ R2 U2 x’ U’ R U R’

R’ F R F’ U2 R2 y R’ F’ R F’
Shape ¯|

R U R’ y R’ F R U’ R’ F’ R

L’ B’ L U’ R’ U R L’ B L

U2 r R2′ U’ R U’ R’ U2 R U’ M

x’ U’ R U’ R2′ F x (R U R’ U’) R B2
Shape |¯

L U’ y’ R’ U2′ R’ U R U’ R U2 R d’ L’

U2 l’ L2 U L’ U L U2 L’ U M

R2′ U R’ B R U’ R2′ U l U l’

r’ U2 (R U R’ U) r
C

R U x’ R U’ R’ U x U’ R’

(R U R’ U’) x D’ R’ U R E’
L

R’ F R U R’ F’ R y L U’ L’

L F’ L’ U’ L F L’ y’ R’ U R

L’ B’ L R’ U’ R U L’ B L

R B R’ L U L’ U’ R B’ R’
P

F U R U’ R’ F’

R’ d’ L d R U’ R’ F’ R

L d R’ d’ L’ U L F L’

F’ U’ L’ U L F
T

F (R U R’ U’) F’

(R U R’ U’) R’ F R F’
W

L U L’ U L U’ L’ U’ y2′ R’ F R F’

R’ U’ R U’ R’ U R U y F R’ F’ R
Z

R’ F (R U R’ U’) y L’ d R

L F’ L’ U’ L U y’ R d’ L’
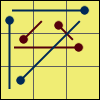
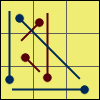
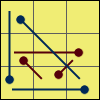
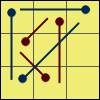
Step 4 – Permute the last layer – PLL
The 4th and final step of the advance friedrich method is the permutation of the last layer (PLL). At this point the white cross, the first two layers (F2L) are both done and the last layers pieces are oriented(OLL). When we execute this last step our rubix cube will be solved.
Again, X and Y (x,y) are whole cube rotations, while lowercase u is double layer turn.
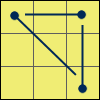
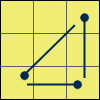
First rotate the top layer to align as many pieces as possible then do one of the 21 algorithms listed below. If this seems too many to learn, you should try the 2 look PLL which method contains only six algorithms but takes more time to execute.
I wrote the name of each algorithm at the beginning of the rotation chain. On the images the dots mark the direction of the permutations (arrowheads).
A 1:x [(R’ U R’) D2]
[(R U’ R’) D2] R2
[(R U’ R’) D2] R2
A 2:x’ [(R U’ R) D2]
[(R’ U R) D2] R2
[(R’ U R) D2] R2
U 1:R2 U [R U R’ U’]
(R’ U’) (R’ U R’)
(R’ U’) (R’ U R’)
U 2:[R U’] [R U] [R U]
[R U’] R’ U’ R2
[R U’] R’ U’ R2
H:M2 U M2 U2 M2 U M2

T:[R U R’ U’] [R’ F]
[R2 U’ R’] U’ [R U R’ F’]
[R2 U’ R’] U’ [R U R’ F’]
J 1:[R’ U L’] [U2 R U’ R’ U2] [R L U’]
J 2:[R U R’ F’] {[R U R’ U’]
[R’ F] [R2 U’ R’] U’}
[R’ F] [R2 U’ R’] U’}
R 1:[L U2′ L’ U2′] [L F’]
[L’ U’ L U] [L F] L2′ U
[L’ U’ L U] [L F] L2′ U
R 2:[R’ U2 R U2] [R’ F]
[R U R’ U’] [R’ F’] R2 U’
[R U R’ U’] [R’ F’] R2 U’
V:[R’ U R’ d’] [R’ F’]
[R2 U’ R’ U] [R’ F R F]
[R2 U’ R’ U] [R’ F R F]
G 1:R2 u R’ U R’ U’ R
u’ R2 [y’ R’ U R]
u’ R2 [y’ R’ U R]
G 2:[R’ U’ R] y R2 u R’
U R U’ R u’ R2
U R U’ R u’ R2
G 3:R2 u’ R U’ R U R’
u R2 [y R U’ R’]
u R2 [y R U’ R’]
G 4:[R U R’] y’ R2 u’
R U’ R’ U R’ u R2
R U’ R’ U R’ u R2
F:[R’ U2 R’ d’] [R’ F’]
[R2 U’ R’ U] [R’ F R U’ F]
[R2 U’ R’ U] [R’ F R U’ F]
Z:M2 U M2 U M’ U2 M2 U2 M’ U2
Y:F R U’ R’ U’ [R U R’ F’]
{[R U R’ U’] [R’ F R F’]}
{[R U R’ U’] [R’ F R F’]}
N 1:{(L U’ R) U2 (L’ U R’)}
{(L U’ R) U2 (L’ U R’)} U
{(L U’ R) U2 (L’ U R’)} U
N 2:{(R’ U L’) U2 (R U’ L)}
{(R’ U L’) U2 (R U’ L)} U’
{(R’ U L’) U2 (R U’ L)} U’
E:X (R U’ R’) D (R U R’)
u2 (R’ U R) D (R’ U’ R)
u2 (R’ U R) D (R’ U’ R)
No comments:
Post a Comment